If you ever have any questions about the online system or need technical assistance, please contact Bruce McGuire at 612.626.2044 or [email protected]
Explore the tabs below to learn about the CEL Course Portal. If you would like the full guide in a document please click here.
Your Community Partner Homepage
When you log in to the system using the CEL Course Portal link from the ccel.umn.edu main page navigation bar, you’ll come to your home page, which will look like this:
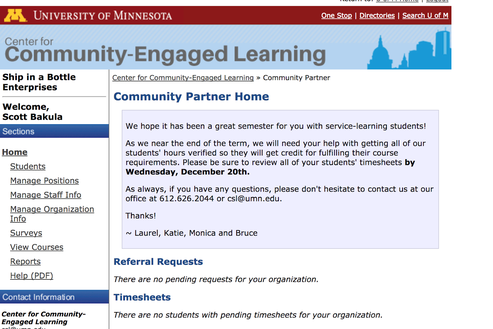
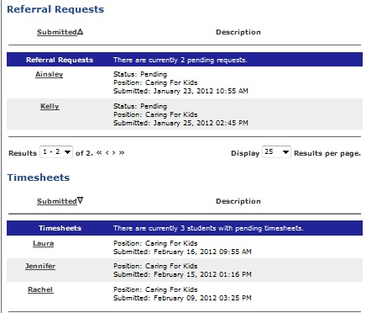
If you have pending referral requests from students and/or timesheets requiring your approval, you will be able to access these items directly from your home page so you can quickly act on these items by clicking the student’s name to bring up his/her referral request form or timesheet.
Accessing Student Information
When you click the “students” link in the left-hand column on your home page, you will see a list of all students who are currently “active” in positions with your organization.
The button in the upper right-hand corner of this page allows you to switch between viewing all students who are currently active with your organization and all students who have ever worked with you.

Please note that this list will include community-engaged learning students currently active in your organization through courses and students in the Community Engagement Scholars Program (CESP). If you see a CESP student on your list of “active” students whom you know has graduated (or at least moved on from your organization), please contact us at [email protected] or 612.626.2044 to have that student removed from your list. Unfortunately, we do not currently have a way for you to remove these students from your list yourself, but we will be happy to do this for you to clean up our system (and, more importantly, to make sure that graduated students are not being counted toward the limit of students who can hold a position in your organization).
Overview of Student Information
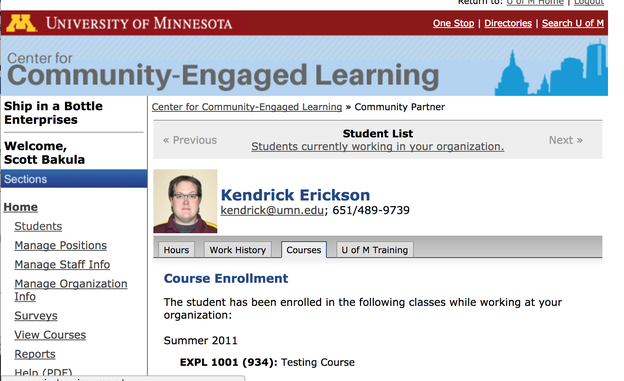
When you click on an individual student’s name, you will see his/her picture, e-mail address and phone number, and tabs for you to find the student’s community-engaged learning course information, position within your organization, attendance at pre-service training workshops offered by the Center for Community-Engaged Learning, and hours. This image shows the student’s community-engaged learning course information.
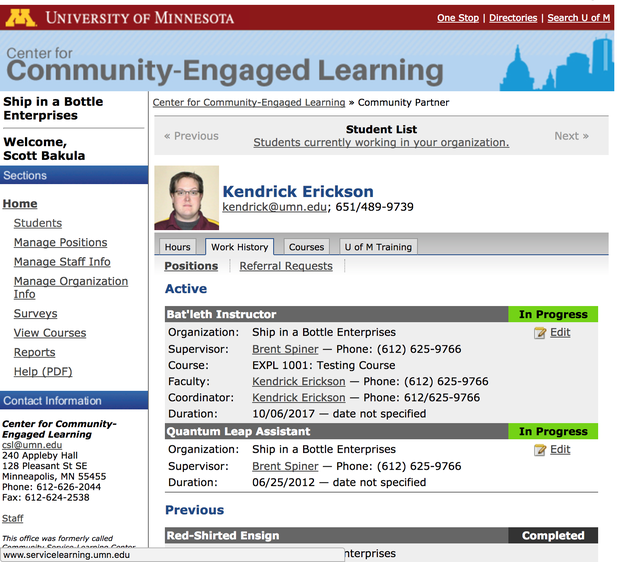
Within the “Work History” tab, you can see the student’s ACTIVE community-engaged learning or CESP position(s) with your organization (these will show as “in progress”), as well as any previous positions the student has held in your organization (marked as “completed”).
Note that on this page, you will also find the name and contact information of the instructor teaching the student’s community-engaged learning course and the name of the coordinator in the Center for Community-Engaged Learning working with that course. Click the instructor or coordinator’s name to send him or her an e-mail.
If a student is working in your organization but has switched to a different position than s/he originally applied for, you can update the online system accordingly by clicking “Edit” under any “In Progress” position (this will take you to the screen shown on the next page).
Moving a Student to a Different Position
You can use the drop-down menu on this page to move the student into a different position within your organization. Be sure to click “Change position” when you are done to save the change you made.
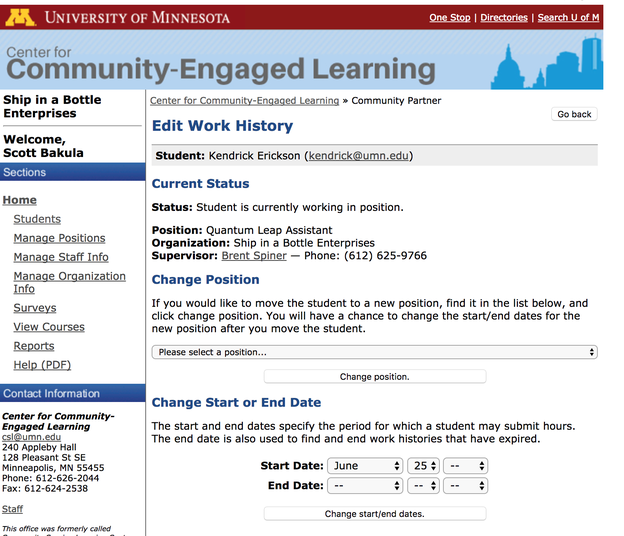
If necessary, you can also change the student’s start date in a position, or assign an end date (for instance, if the student leaves your organization partway through a semester for any reason). Use the drop-down menus to change the start and/or end dates, then click “Change start/end dates” to save your changes. If you are changing a student’s position and start/end dates, you will need to do this in two separate steps and save the changes after each step.
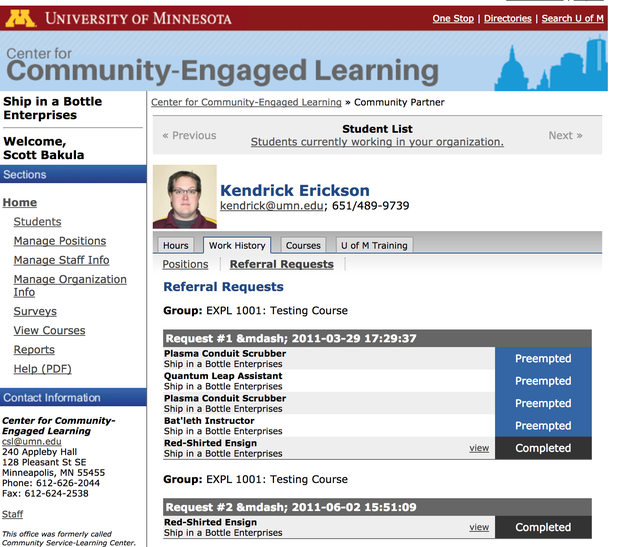
Viewing a Student's Referral Request
Within the Work History tab, you can also access the referral request form the student submitted to work with your organization. When you click “view” on a specific referral request listed on this page, you can review what the student stated as the reason for their interest in your organization, and the availability they listed on the schedule portion of the form. Again, this page will show referral requests from the current semester (“in progress”), as well as previous requests the student has submitted for your organization.
Pre-Service Training Information and Overview of Student Hours
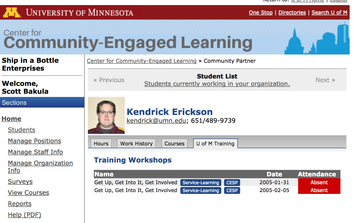
When you click on the “U of M Training” tab in a student’s record, you can see whether the student has attended a pre-service training workshop offered by the Center for Community-Engaged Learning. These workshops are often required or strongly encouraged by faculty as part of the community-engaged learning component of their courses.
When you click on the “Hours” tab, you will see the following entries:
- “Not submitted” refers to hours the student has entered on a timesheet, but has not yet submitted to you for your approval.
- “Submitted” hours are awaiting your approval.
- “Approved” hours are those you have already verified.
- If any hours were entered incorrectly and you “rejected” them, those are also displayed here.
- This page also shows a complete list of the student’s weekly timesheets
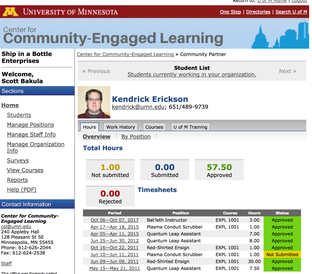
If a student is working or has worked in more than one position within your organization, you can click the “By Position” link on this page to see only the hours for one position.


Approving and Editing Students’ Hours
If you click on the dates for any timesheet that is listed as “Pending,” or if you click on a student’s name from your home page where it shows students with pending timesheets (see page 2), you will be able to approve the hours on that timesheet. To approve the hours, check the box under “Approve/Reject,” then click the “Accept Selected Hours” button.
Please note that you can click “edit” to fix a student’s timesheet if the student entered hours or days incorrectly. This is the easiest way to correct minor mistakes the student may have made so you can quickly accept the hours. Please see the note on the web page below about the consequences of rejecting students’ hours and try to avoid rejecting hours whenever you can. However, if you notice that a student logs hours for more than one week when you don’t think s/he was at your organization, please contact the CCEL coordinator assigned to that class for follow up, sometimes students switch positions and don’t tell CCEL which can result in this happening.
This screen will always provide a complete history of a student’s hours with your organization, including hours you have approved and hours that are awaiting your approval.

Moving from One Individual Student Record to Another
When you are reviewing an individual student’s record, you can use the “Previous” and “Next” links to move through your student list and review each student’s record.
The system will automatically go to the same tab on the previous or next student’s record, so if you are reviewing students’ hours logged to date, you can look at the first student’s “Hours” tab, then click “Next” to work your way through your student list and see each student’s hours in turn.

Editing Your Staff Information
Back on your home page, you can use the “Manage Staff Info” link in the left-hand column to make any needed updates to your staff members’ information pages on the system.
When you click this link, you’ll see the following screen. From here, you can click the link to “Add a staff member” if you would like any additional staff at your organization to have access to the system (you will need to create a unique user name and password for each staff member you add).
For staff members that are already listed in the system, just click an individual’s name to update his/her information.

When you click an individual staff member’s name, you will be able to edit his/her name, title, contact information, user name and password. Every staff member can also indicate whether s/he would like to receive the Community Service-Learning Center’s monthly electronic newsletter, and can select the frequency of e-mail reminders about timesheets awaiting approval. When you are finished, be sure to click the “Update Information” button to save your changes.

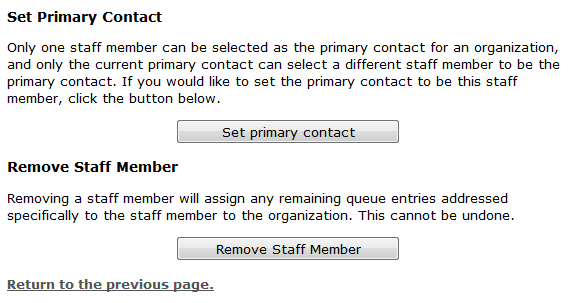
Each organization also has a designated “primary contact” in this system, the initial point of contact for service-learners or the main person at your organization who will answer questions from students, faculty, and service-learning staff. The primary contact is also the only staff person who can remove another staff person from the system or designate another staff member as the new primary contact. When the primary contact reviews information for other staff members, s/he will have the following additional options at the bottom of each other staff member’s page:
Editing Your Organization Information
When you click on “Manage Organization Info” in the left-hand column, you can make any needed changes to your organization’s name, address, web site, and general description.

On this page, you can also indicate whether service-learning students who want to work with your organization need to undergo a criminal background check before being accepted. This is helpful information for students deciding where they want to do their service-learning, and also for us to have a better sense of how long your application process may take.
Be sure to click the “Update Information” button when you are finished to save your changes.
Editing Your Service-Learning Position Information
When you click “Manage Positions” in the left-hand column, you will see a list of all your current service-learning positions.

From this screen, you can click the name of a position to edit that position description, or click “Add a new position” to post a new opportunity for service-learning students.
You may notice that this page also has a “Manage Programs” option near the top. This system was designed with a programs function that allowed organizations to group related service-learning positions together. A decision was made not to use this function of the site, but it would be difficult for our programmers to remove it now without making significant changes to the overall system structure. For now, please disregard the “Manage Programs” link.

When adding or editing service-learning positions, please note that every position needs to have a member of your organization’s staff designated as the supervisor, and that person will receive all the notifications that students have submitted timesheets for that position. You can designate a different staff person to handle referral requests from students at the beginning of the semester. Please be sure to keep these two fields in your position descriptions up to date as your organization has staff changes!
Also note that including complete and detailed information in the position description, especially about the position schedule and required orientation sessions (especially those that occur on specific dates), helps students make sure that their availability meets your needs before they submit a referral request to work with you.

Here is the bottom part of the position description screen.
As mentioned on page 3 of this guide, if you set a limit to the number of openings you have for a position and you have that number of service-learning students and Community Engagement Scholars listed as “active” in that position, new service-learning students will not be able to submit referral requests for that position, so you may need to increase the number of openings.
If you have a position listed on the system that does not currently have any students working in it, you will find an option on this page to remove that position from the system completely. If you do not want students to be able to request a position during the current semester but may offer it again in the future, you can mark the position as “inactive.”
When you are finished, be sure to click “Update Information” to save your changes.
Using the Reports Function to Generate a List of Students
As of January 2013, this system has a new function, Reports, that allows you to generate a list of all the University of Minnesota students who have worked with your organization and the number of hours they have worked. Click “Reports” in the left-hand column to access this feature.

When you click on “Student Roster,” you can choose to see the report displayed on your screen (“Web-based report”) or export the data to a Microsoft Excel spreadsheet. Select one of these options before clicking “View Report.”

In either format, the resulting report will show the following information:
- Students’ names
- Position(s) they have held in your organization
- Whether they are still working with your organization (position status “In Progress”) or have finished their service with you (position status “Completed”) – note that if a student shows up here as In Progress but s/he has left your organization, you can follow the instructions on page 6 of this guide to enter an end date for their service, which will change their status to completed
- If the student is/was working with you as part of a service-learning class (“Subject,” “Catalog Number,” “Section,” and “Term” refer to service-learning classes) or for the Community Engagement Scholars Program (“CESP” will appear under “Subject” for these students)
- Number of hours the student has submitted for your approval that have not yet been approved
- Number of hours you have approved for the student (“Accepted Hours”)

You can use this report to keep track of all the students who are working with you during a particular semester and to track the total number of hours U of M students have contributed to your organization each semester or overall. The report will list all students who have ever worked with your organization, but if you export the data to Excel spreadsheet you can easily work with the specific data you want (for example, showing only the students who worked with you during a specific semester, academic year, or calendar year) and you can use Excel’s formulas to calculate the total number of hours the selected students have contributed to your organization.
Accessing Information about Service-Learning Classes You Are Partnered With
Click “View Courses” in the left-hand column to see a list of the service-learning courses you are currently and have previously been partnered with. (This is another new feature as of January 2013.)

When you click on the link for a specific course, you will see a list of the specific positions within your organization that students in that course could choose. You will also see a brief description of the course, and you can access the course syllabus and any reflection assignments the faculty member has uploaded to the system by clicking on the links for the attached files.

Accessing Service-Learning Survey Results
Finally, clicking “Surveys” in the left-hand column will allow you to access the results of the surveys students who have worked with your organization filled out at the end of their service-learning class.

Note that you can view the results of all surveys that have ever been submitted about your organization, or you can choose to view the responses of all students who worked in a particular position within your organization and/or who worked with your organization during a specific semester (term). Use the “Reset Search” button to view a different set of survey results.
Also note that the survey results are anonymous and aggregated; for confidentiality, you can’t access an individual student’s responses to the survey. In the survey results, next to the percentage of students who selected each response, the number of students who selected that response is noted in parentheses. (In this example, only one student has filled out the survey for this position so their responses represent 100% of the total.)
